
If you’re reading this, chances are you're either managing a fleet of devices joined to Entra (formerly Azure AD) or are considering a shift to Entra-joined devices. You might be wondering whether you'll still be able to run remote scripts, access shared resources, or perform all the tasks you're used to on domain-joined machines. Don’t worry! With a few configurations and the right tools, you can still enjoy a smooth, effective way to connect and manage these devices remotely.
With just a few tweaks, you’ll be able to query WMI on remote Entra-joined devices, run PowerShell sessions, move files, explore logs, and so much more—all without needing any intervention from end users. So, let’s get started and make remote management a breeze!
Here’s a quick checklist of essential configurations to set up to be able to remotely manage Entra joined Windows computers:
- Network Connectivity: Ensure there’s a clear path to the device—this might be through a routable network, VPN, or direct line of sight for network access.
- Firewall Configuration: Configure the firewall with the Domain Profile enabled, even for Entra-joined devices, to allow secure remote connections. This step is essential to enable remote management without compromising security.
- Local Administrator with LAPS: Create a Local Administrator Account and implement a Local Administrator Password Solution (LAPS). This will provide secure access credentials for remote management.
- User Rights Assignments: Define user rights to give specific accounts access to remote management. By assigning the correct permissions, you can ensure only authorized users can remotely manage these devices.
- WinRM over HTTPS: Enable Windows Remote Management (WinRM) over HTTPS to securely run PowerShell sessions on remote devices, adding an extra layer of security for your management tasks.
- Explorer Configuration for Alternate Credentials: Adjust Windows Explorer to allow launching it with alternate credentials. This setting allows you to transfer files between computers remotely, even if you aren’t locally logged into the target device.
Remotely manage Entra joined Windows computers
Network Connectivity
There’s no way around this one! 😊 You need a clear, routable path to the remote computer, whether that’s through a direct network connection, VPN, or other secure access method. Make sure the device is reachable on the network to enable smooth remote management. DNS is also important! (just going to leave it here!)
Firewall
Let’s start by configuring the firewall for remote management on Entra-joined devices. We’ve made this easy with a step-by-step guide that walks you through the process. Check it out here: Essential Firewall Configuration for Secure Remote Management on Azure AD Joined Devices.
Local Administrator with LAPS
Once your firewall is set up, the next step is configuring a Local Administrator on your remote computers. This account will allow you to securely connect to your devices. And as it happens, we’ve got you covered here as well! You can find our simple guide for configuring a Local Administrator here: Configuring a Local Administrator for Remote Access.
User Rights Assignments
Configuring User Rights Assignments is crucial, especially if you’re working with Microsoft Security Baselines or CIS security baselines. By default, these baselines disable remote management for local administrators for security reasons. However, with a properly configured firewall and LAPS, allowing remote access for local administrators can be secure and effective on Entra-joined devices.
First, we need to make sure that Deny Access From Network is NOT set to NT AUTHORITY\Local Account (*S-1-5-113)
If you don’t explicitly set the “Deny access to this computer from the network” policy, it doesn’t automatically mean that all users will have access. Instead, access will be governed by other existing policies and permissions.
By default, only users with the appropriate permissions (like members of the Administrators group) will have network access. However, it’s a good security practice to explicitly define who should be denied access to ensure that unauthorized users cannot connect to your system over the network.
To keep things secure, it’s best to configure the settings so that all local accounts are disabled, except for the specific Local Admin account you plan to use for remote management LocalAdmin in our case. This approach ensures that only the designated Local Admin has remote access, reducing potential attack vectors and keeping your Entra-joined devices secure.

Now we can add our account to Access from Network like this
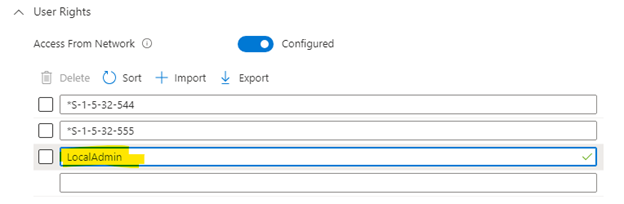
This configuration ensures that only Administrators, Remote Desktop Users, and your designated Local Admin account can remotely access the Entra-joined device, keeping access strictly controlled.
Next, we need to apply UAC restrictions to local accounts for network logons. Microsoft advises this setting to reduce the risk of credential theft. While using a shared local admin password across devices increases the security risk, implementing LAPS mitigates this by automatically generating unique passwords for each Local Admin account and rotating them daily.
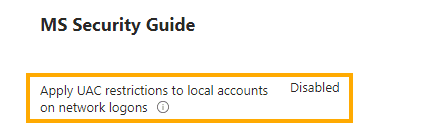
Quick Note: Running the winrm quickconfig command will configure the same UAC restriction configuration temporarily, but keep in mind that this setting may be overwritten later if it’s not configured permanently through your Intune settings!
With everything configured, you’re now ready to test WMI Remote Management on Entra-joined computers!
Let's test and remotely manage Entra joined Windows computers!
To test WMI Remote Management on Entra-joined computers, follow these steps:
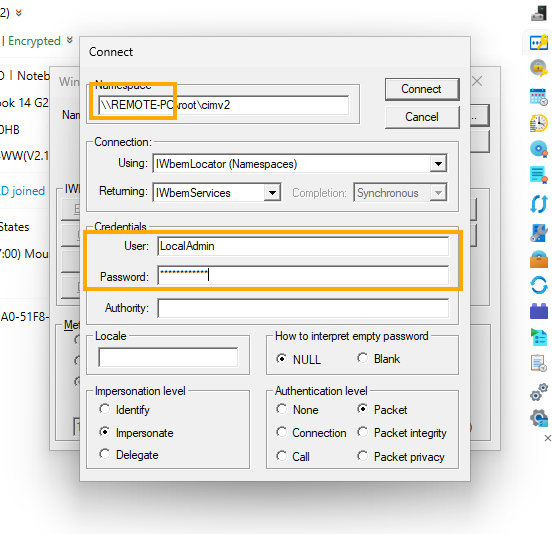
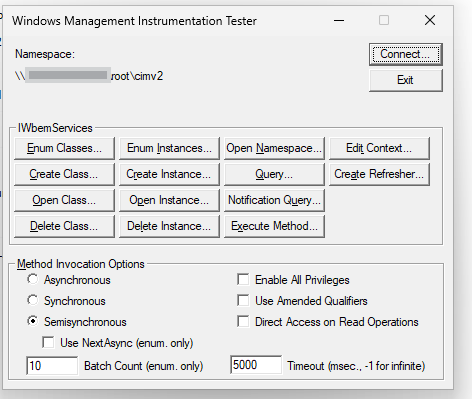
1. Open WBEMTest: Launch the WMI Tester by typing wbemtest in the command line and pressing Enter.
2. Retrieve Credentials: Use Intune to get the Local Admin account name and the current password managed by LAPS.
3. Connect:
4. In WBEMTest, click on Connect.Enter the computer name, Local Admin username, and password in the respective fields.Click Connect to initiate the remote connection.
With these steps, you’ll be able to confirm your remote WMI configuration is working smoothly!
This quick test is an efficient way to confirm that all configurations—Firewall settings, Local Admin account setup, and User Access Control (UAC) settings—are correctly in place and working as expected. If the connection succeeds, you’ll know your Entra-joined device is ready for secure remote management!
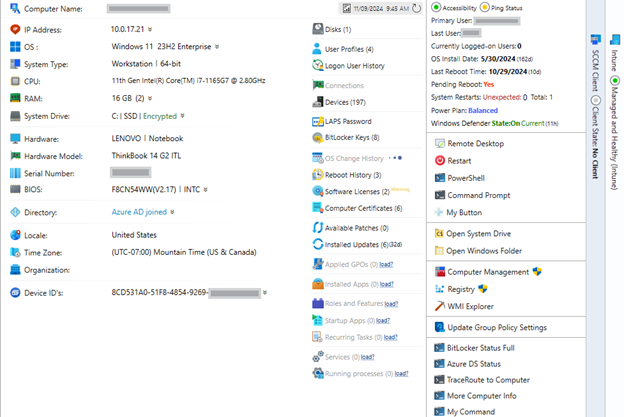
With MPA Tools, remote management of Entra-joined workstations becomes even easier. MPA Tools automatically retrieves the username and password from LAPS and securely uses these credentials to connect to the remote computer. This setup allows you to efficiently manage one or multiple computers simultaneously, streamlining your remote management tasks while maintaining security.
But that’s not all! To fully unlock remote management capabilities, we’ll also want to:
1. Enable Remote Share Access: Ensure that you can open and manage remote shares on Entra-joined devices. This allows seamless file transfers and resource sharing between systems.
2. Set Up WinRM over HTTPS: Configure Windows Remote Management (WinRM) over HTTPS for secure PowerShell remote sessions. This setup allows you to run PowerShell commands and scripts on remote devices, providing powerful control and automation capabilities.
Enable Remote Share Access
Now that we’ve allowed the SMB protocol through the firewall, let’s ensure we can connect to remote shares seamlessly.
With MPA Tools, accessing remote shares is simplified. When you click the Remote Share button, MPA Tools will automatically establish the connection using the correct credentials.
However, if you want Windows Explorer to open the remote share in a different context (such as with alternate credentials), there’s a quick registry tweak needed on the computer where MPA Tools is running:
- Take Ownership and Grant Full Control:
- Open Registry Editor (Win + R, type regedit, and press Enter).
- Navigate to:
Copy code
HKEY_CLASSES_ROOT\AppID\{CDCBCFCA-3CDC-436f-A4E2-0E02075250C2}
- Right-click the key and select Permissions. Take ownership of this key and grant yourself Full Control.
- Rename the “runas” Subkey:
- Locate the subkey named runas within this registry path.
- Rename it to _runas. (If you get an error, double-check that you have Full Control over the key).
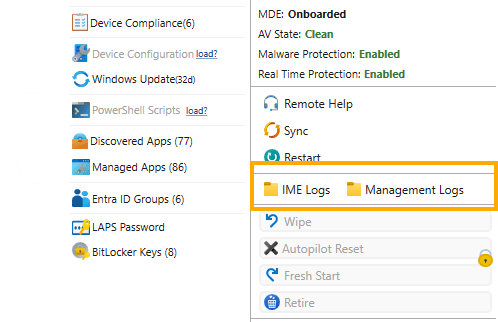
Now you can easily open IME Logs on a remote computer for quick troubleshooting! Easy!
Last but Definitely Not Least to fully remotely manage Entra joined Windows computers we need to configure WinRM over HTTPS
WinRM over HTTPS for Remote PowerShell Sessions
To enable secure PowerShell remote sessions with WinRM over HTTPS, we’ll need three essential components:
1. Server Authentication Certificate: Distribute a server authentication certificate to your Entra-joined devices. This can be done through PKCS or SCEP in Intune to ensure each device has a trusted certificate for secure communication.
2. Proactive Remediation Scripts in Intune: Set up proactive remediation scripts to configure the WinRM Listener with the certificate. This automates the process, ensuring each device is ready for secure remote PowerShell sessions without manual intervention.
3. Security Configuration for Trusted Hosts: Harden your WinRM setup by configuring a Trusted Hosts list. This setting allows only authorized systems to connect, adding an extra layer of security for remote management.
Server Authentication Certificate
To create and distribute a Server Authentication Certificate for enabling WinRM over HTTPS on Entra-joined devices, you can use PKCS in Intune to securely deliver the certificate. Here’s how to set it up:
1. Create a Server Authentication Certificate
If you have a Certificate Authority (CA) in your environment, you can create the certificate as follows:
Ensure that your endpoints already trust this Certificate Authority (CA)! If they don’t, you’ll need to create a Trusted Certificate profile in Intune and upload the Root Certificate for this CA to establish trust across your devices!
- Open the Certification Authority Console on your CA server.
- Right-click Certificate Templates and choose Manage.
- Locate the Web Server template (or a similar server authentication template), right-click it, and select Duplicate Template.
- Configure the duplicated template:
- Go to the General tab and give it a unique name (e.g., “WinRM Server Certificate”).On the Request Handling tab, ensure Allow private key to be exported is checked.On the Subject Name tab, choose Supply in the request.
- Save the template and exit.
Now, return to the Certification Authority Console, right-click Certificate Templates, go to New, and then Certificate Template to Issue. Select your new template to make it available for requests.
1. Distribute the Certificate via PKCS in Intune
Now that you have the certificate template, follow these steps to deploy it with PKCS:
1. In Intune:
2. Go to Devices > Configuration Profiles > Create Profile.Select Windows 10 and later as the platform.Choose PKCS certificate as the profile type.
3. Configure Profile Settings:
4. Name: Give the profile a clear name (e.g., “WinRM Server Certificate”).Description: Optionally, add details about the certificate’s purpose.Under Certificate Type, Device
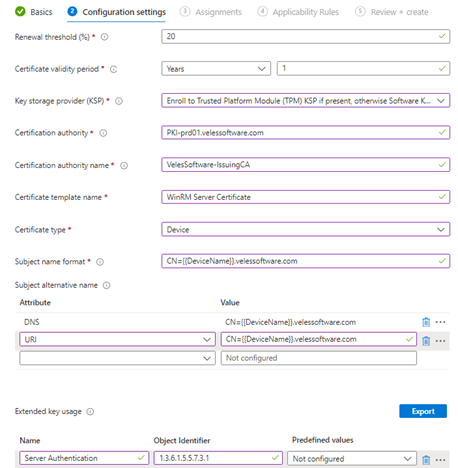
5. Configure Certificate Settings:
6. Renewal Threshold – 20Certificate validity period – 1 yearAdd your Trusted Certificate Authority. Under Subject Name Format, choose Common Name or configure as needed.For Certificate Template Name, enter the exact name of the certificate template you created (e.g., “WinRM Server Certificate”).
Example
1. Assign the Profile:
2. Assign this certificate profile to the appropriate Azure AD groups containing your Entra-joined devices.
3. Review and Create:
4. Review your settings and click Create to deploy the profile.
Configuring the WinRM Listener
Now, let’s set up the WinRM Listener to enable secure remote management over HTTPS. To streamline this, we’ll use a Proactive Remediation Script in Intune. Here’s what you need to do:
1. Prepare the Detection and Remediation Scripts
Use the detection script to verify that the WinRM Listener is configured correctly. Make sure that the settings in this script match the details you specified in your PKCS certificate profile—such as the certificate’s subject name or thumbprint. Consistency here ensures the listener binds to the correct certificate.
1. Sample Detection Script (replace placeholders with actual values):
$WCS = Get-CimInstance -ClassName Win32_ComputerSystem$FQDN="$($WCS. Name).{YOUDOMAIN}.com"$Thumbprint = (Get-ChildItem -Path Cert:\LocalMachine\My\ |Where-Object -FilterScript {$_. EnhancedKeyUsageList -in ‘Server Authentication (1.3.6.1.5.5.7.3.1)' -and$_. Issuer -eq ‘CN={Certification authority name}, DC={YOURDOMAIN}, DC=com' -and$_. Subject -eq “CN=$FQDN"}). Thumbprint
$Listener = Get-ChildItem -Path WSMan:\LocalHost\Listener | Where-Object { $_. CertificateThumbPrint -eq $Thumbprint }
if ($Listener) {Write-Output “Compliant"exit 0} else {Write-Output “Not Compliant"exit 1}
Remediation Script: Use a remediation script to configure the WinRM listener with the certificate if it’s missing or misconfigured. Ensure this script aligns with the PKCS profile details (like the certificate thumbprint or common name).
$WCS = Get-CimInstance -ClassName Win32_ComputerSystem$FQDN="$($WCS. Name).{YOURDOMAIN}.com"$Thumbprint = (Get-ChildItem -Path Cert:\LocalMachine\My\ |Where-Object -FilterScript {$_. EnhancedKeyUsageList -in ‘Server Authentication (1.3.6.1.5.5.7.3.1)' -and$_. Issuer -eq ‘CN={Certification authority name}, DC={YOURDOMAIN}, DC=com' -and$_. Subject -eq “CN=$FQDN"}). Thumbprint
try {New-Item -Path WSMan:\LocalHost\Listener -Transport HTTPS -Address * -CertificateThumbPrint $Thumbprint -ForceWrite-Output “WinRM listener created successfully with thumbprint $Thumbprint"
} catch {Write-Output “Failed to create WinRM listener: $_"
}
Deploy in Intune:
- Go to Endpoint Security > Proactive Remediations in Intune.
- Create a new Proactive Remediation Script and upload both Detection and Remediation scripts.
- Assign it to the appropriate device groups to automate listener configuration.
Quick Note: With MPA Tools, you can easily check the Write-Output logs to see the results of the last run of your proactive remediation scripts. This feature allows you to quickly review script output, making it simple to verify whether the WinRM Listener was configured correctly or troubleshoot any issues directly.
For our WinRM configuration, we’ve covered the essentials:
- Firewall is set up to allow secure connections.
- LAPS is in place for secure local admin credential management.
- Server Certificate is deployed on each device.
- WinRM Listener is configured with the certificate.
Now, the final step is to apply a few additional hardening settings in Intune to make this setup even more secure and reliable. These configurations will help safeguard remote access and ensure your devices are fully prepared for secure remote management.
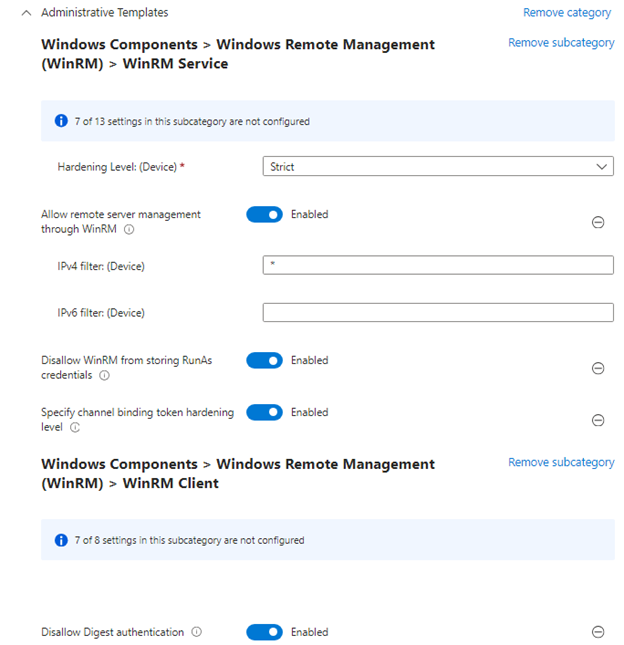
Quick reference for WInRM configurations from Microsoft
This is super straightforward
Lets test!
To initiate a remote PowerShell session with your configured Entra-joined device, follow these steps:
1. Open PowerShell and enter the following command:
Enter-PSSession -ComputerName REMOTE-PC.yourdomain.com -Credential (Get-Credential) -UseSSL
1. When prompted, enter your LAPS-managed Local Admin username and password.
Watch the magic happen as you securely connect to the remote device over HTTPS! With your WinRM, certificate, and LAPS setup in place, this command gives you full, secure access to manage and troubleshoot remotely.
With MPA Tools, all that magic happens seamlessly in the background! MPA Tools automatically creates and manages remote sessions for you, handling credentials, initiating connections, and configuring sessions—so you don’t have to look up passwords or manually enter commands one by one. It’s a streamlined, secure, and efficient way to manage remote devices with just a few clicks.
Conclusion
With these configurations in place, you now have a comprehensive setup to Remotely Manage Entra Joined Windows Computers. From configuring the firewall and setting up LAPS to deploying a server certificate and enabling WinRM over HTTPS, each step enhances security and functionality. Tools like MPA Tools streamline this process by automating connections and managing credentials, allowing you to focus on managing your devices effectively. By following these best practices, you’ll achieve reliable, secure, and efficient remote management capabilities for your Entra-joined Windows devices.