
Hey, hard-working fellow sys admins! If you’re managing devices through Intune, you know thatkeeping them compliant isn’t just a checklist item—it’s a must-have for securing our network and data. Intune usually keeps everything in check automatically, but there are times when we need to give it a little nudge tomanually enforce compliance.
This guide dives into the hands-on steps for those times when you justcan’t afford to wait for Intune and Azure AD to sync. After confirming that the device meets compliance requirements, you can manually set the compliance state on the Entra Computer object, letting users get back to their day without delays. This is especially critical in aZero-Trust environment, where access to network and app resources hinges on compliance status.
Why Manually Enforce Device Compliance?
Let’s be real—waiting for Intune to check and sync compliance isn’t exactly speedy. Syncs can take anywhere from30 minutes to several hours—and we all know that even a 15-minute delay can lead to some very frustrated users! So, here’s how to stay in control, minimize downtime, and keep everyone productive without the wait.
I’m sure we’ve all been there: Intune shows a device ascompliant, but Azure AD stubbornly insists it’s non-compliant. Even after forcing a sync in Intune, the device might finally show as compliant, but the user is still stuck in anon-compliant state—effectively locked out of resources.
This situation is especially common afterAutopilot Pre-provisioning and a quick compliance check. Sometimes, a device that’s been offline for a while rightfully falls out of compliance, but after bringing it back online and confirming everything is up-to-date and healthy, it can still takehours to reflect as compliant. Meanwhile, users are left waiting—and we all know that’s not ideal!
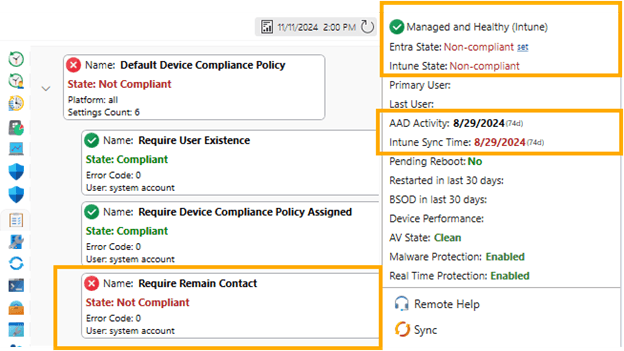
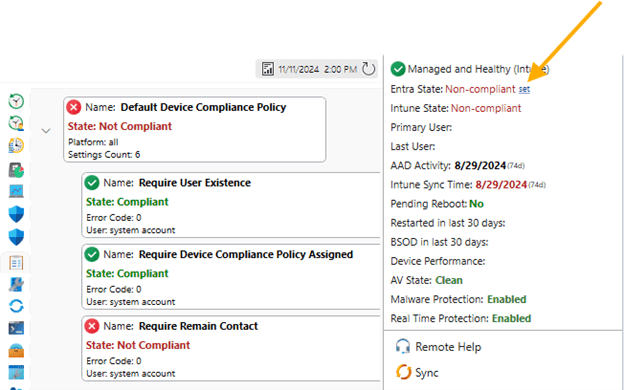
That’s why we’ve added the ability inMPA Tools for IT professionals to manually set the compliance state on theEntra Windows object. Now, Service Desk or Helpdesk teams can quickly review a device’s overall health, and after confirming everything is in good shape, they canmanually enforce compliance.
Important Note: If you set the compliance state on a device that isn’t truly compliant, it will revert tonon-compliant after the next Intune and Entra sync. That’s why it’s crucial toonly set compliance manually after confirming the device is fully compliant in Intune!
Step 1: Dive into Device Compliance Settings State
InIntune orMPA Tools, you can quickly review which specific policy is marking a device asnon-compliant. For instance, let’s say a device was pre-provisioned and has been sitting on a shelf, ready to be shipped or handed to a user. However, if your compliance policy requires the device tocheck in with Azure AD every 30 days, it may now show as non-compliant. This feature helps you identify and address these compliance gaps before the device reaches the user.
Keep in mind, this is just one of many scenarios that can impact a device’s compliance status. There could be multiple policies in your environment that affect compliance, each with unique requirements. Understanding how these policies interact on each device can help you quickly pinpoint and resolve compliance issues!Types of Intune compliance policies.
Step 2: Forcing a Compliance Check
Before manually enforcing the compliance state, let’s make sure we’ve done everything we can totrigger a compliance check first.
Sync Device Check-in in Intune:
1.Go toDevices > All devices and locate the device you want to check.
2.Select the device, and clickSync.
3.This action will force the device to update its compliance status based on the latest policies. Just note, it might take some time for the status to reflect.
Sync Device Check-in in MPA Tools:
WithMPA Tools, it’s even simpler—one click triggers a sync on the device, making it quick and easy to update the compliance status.
Force a Compliance Check via PowerShell:
Alternatively, you can run a PowerShell script locally to force a compliance check:
Start-Process -FilePath “C:\Program Files (x86)\Microsoft Intune Management Extension\Microsoft. Management. Services. IntuneWindowsAgent.exe" -ArgumentList “intunemanagementextension://synccompliance"
You can also useMPA Tools to run this script remotely, or configure it as a proactive remediation script that you can run on demand.
Step 3: Checking the Compliance Status
Once the sync is complete, let’s check the compliance status:
- Return toDevices > All devices, find the device, and verify if the compliance status has updated.
- If it’s still showing as non-compliant, go toDevice Compliance to investigate any specific issues causing non-compliance.
If a device still shows as non-compliant, even though you’ve confirmed everything (like OS version and encryption) is healthy, you can safely enforce compliance manually. And remember—if something is genuinely non-compliant,Intune will automatically revert the compliance state once it rechecks.
Key Takeaways
Manually enforcing compliance is something we all run into from time to time—especially when time is tight, and automated checks just aren’t quick enough. By following these steps, you can give your devices a compliance boost and keep your environment secure. And with a tool like MPA Tools, you can do it all with just one click, making the process even faster and easier!